Azure Logic App That Writes Service Bus Messages to A Data Lake
The title says it ALL! Um, no it doesn’t. The title gets right to the point, but by no means is that ALL. This article will talk about everything you need to setup all of this as well. Don’t do what I did and JUMP right into the Logic App, because you may miss something along the way and you will have to delete steps and redo things. But that’s what I did. I jumped right into it and wanted things to just WORK dammit! My main hiccup was that I wanted to use the default security so I DIDN’T have to set up an Application Registration through Azure Active Directory (AAD). I don’t advise that. PLUS, my browsers, all three: Chrome, Edge, and IE, were blocking the popup and the connection would fail. I explicitly turned OFF popup blocking in all three browsers and yet Azure was giving me an error that the popup was being blocked. I spent WAY too long trying to figure out how to ALLOW the popups and head down the “easy” path, when I should have been looking at connecting to resources using Service Principles (AAD Application Registrations).
I currently do all my Azure testing in an Enterprise account where I am allotted $150 a month, and most months I only use about $50 of that (mostly MooVee Picker). This means that I try to keep things lean and mean and run the “Azure AD Free” version of my Default Directory.
I’m also assuming you are SOMEWHAT familiar with navigating through the Azure Portal (https://portal.azure.com) You may not be an expert, but you at least know how to navigate.
A Table of Contents (of sorts – no page numbers OR hotlinks)
- Create Azure Active Directory Application Registration
- Create Service Bus Namespace
- Create Topic
- Create Subscription
- Create Data Lake
- Add access for AAD App Reg
- Add new folder “log01”
- Create Logic App
- Trigger from Subscription
- Complete the message
- Test
- Write Message to Data Lake
- Test
Create Azure Active Directory Application Registration
Where is Azure Active Directory? It’s not in the “All Resources” view. If you’re like me, which you might not be, you have AAD at the TOP of your favorite’s menu on the left. I like it there because that “resource” isn’t in the “All Resources” view.

Select “All Services”, search for “Active”, and Azure Active Directory should show up in the filtered list. Your entry is probably not marked as a favorite. Go ahead and mark it and it will be at the BOTTOM of your favorites list in your menu. Drag it to the top (if you want to be like me). Otherwise have fun searching for this resource all the time. I forget if you have to create one for the first time, but I don’t think you do. I believe this AAD resource is part of your subscription.
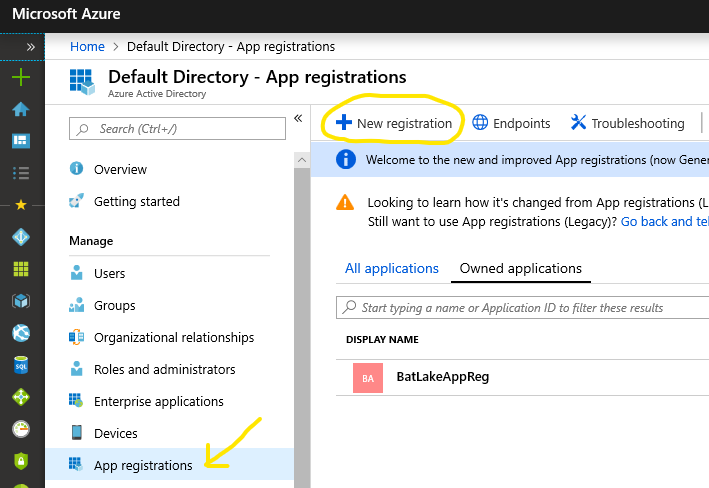
Once you select your AAD favorite icon, you will be able to select the “App registrations” section under the “Manage” section and create a “New registration”.
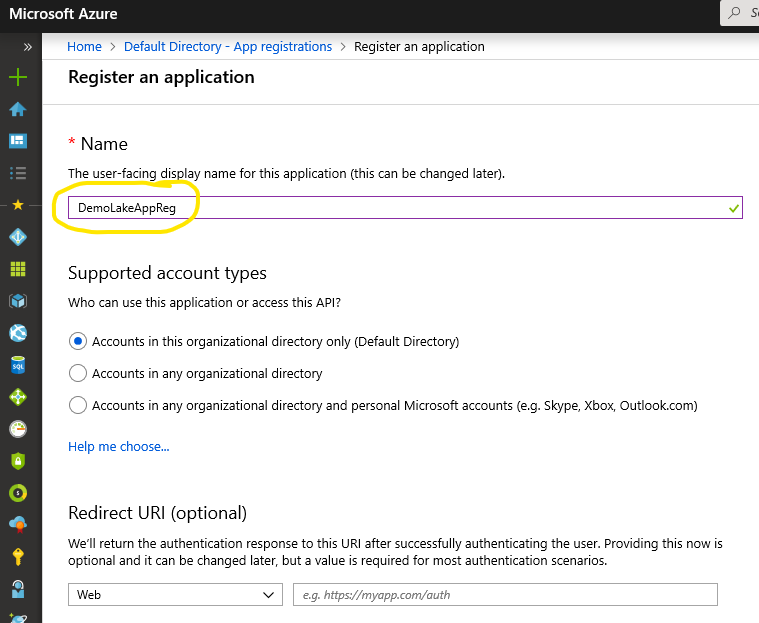
Enter a name for your Application Registration. I chose the highly original name “DemoLakeAppReg” (fig. 3). I added the “AppReg” suffix so if this name shows up in a listing that I don’t recognize, I know where it came from. As the screen says “(this can be changed later)”. In this run through I will omit the Redirect URI, unless it’s absolutely needed for this demo and then I’ll just edit this text and you will never know (I’m re-reading this and I didn’t need it). Once you select your options, click on the “Register” button at the bottom of the screen (not pictured to save space).

When you register your application, you will be taken to its overview. This will display the client and tenant keys that you will need later. Please note the “Certificates & secrets” section that we will visit a bit later.
Create Service Bus Namespace
Add a service bus (namespace) by clicking on the plus icon, search for “service bus”, and select that new resource. That will take you to the “Create namespace” form. (fig. 5) Enter a unique name for your service bus namespace. I started with “demo-bus” and that was already taken, so I started to enter “ncm” after “demo” and was successful after I typed the “n” so I went with it. Demon Bus it is! I chose the Premium tier, because I wanted to see what the cost differences are compared against another service bus that I have that uses the lowest tier. Choose the best plan that suits you since it won’t affect this example.
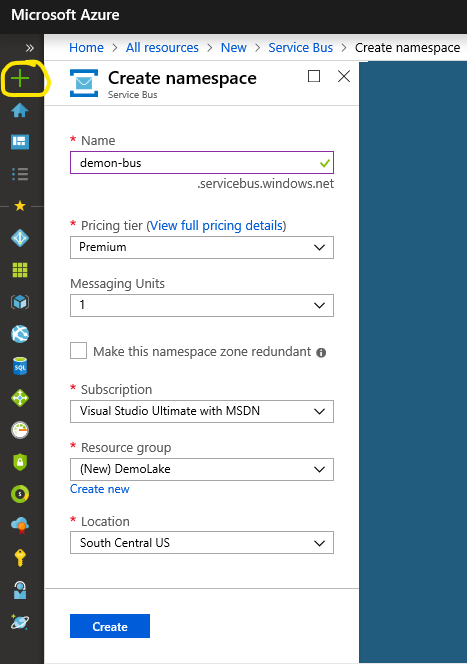
When creating this namespace it was the first time I had to choose a resource group, and I created a new resource so I could filter out all of the other resource groups that I have going on in my subscription. (fig. 5)
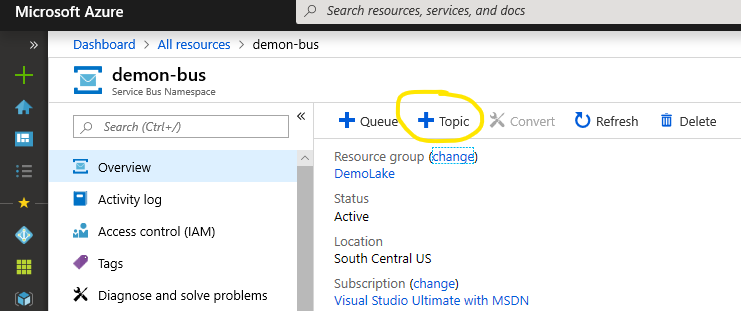
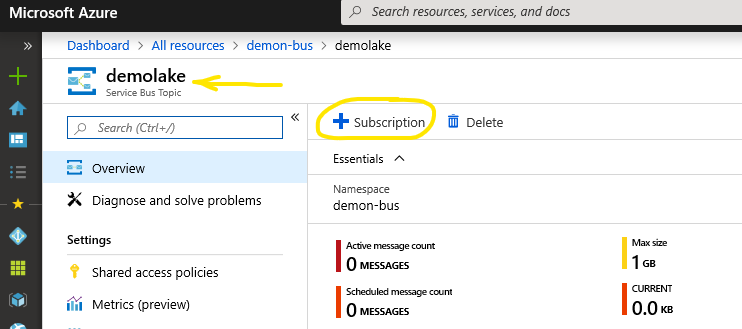
Create a Topic and just call it “demolake” (fig. 6); choosing all the defaults is fine. Select your new topic in the overview and create a new subscription and call it “demolakesub” and stick with the defaults. (fig. 7)
Create Data Lake
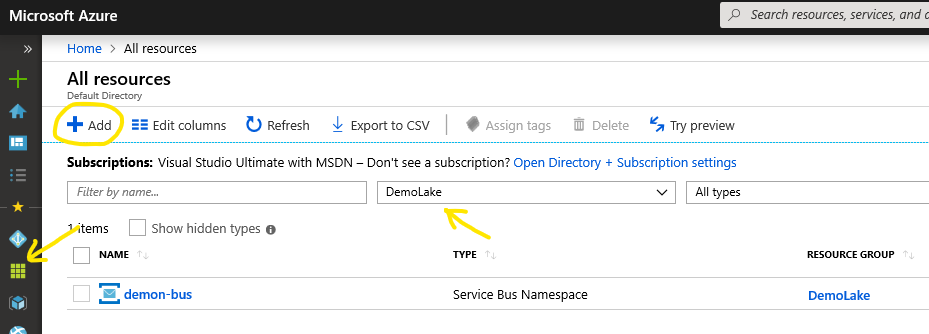
When you select the “All Resources” icon and then filter down by [your resource group name here] (why do I hear GLaDOS’s voice here?) or DemoLake if you’re like me. (fig. 8) Select the “Add” option, search for “data lake”, and I chose Data Lake Storage Gen1.
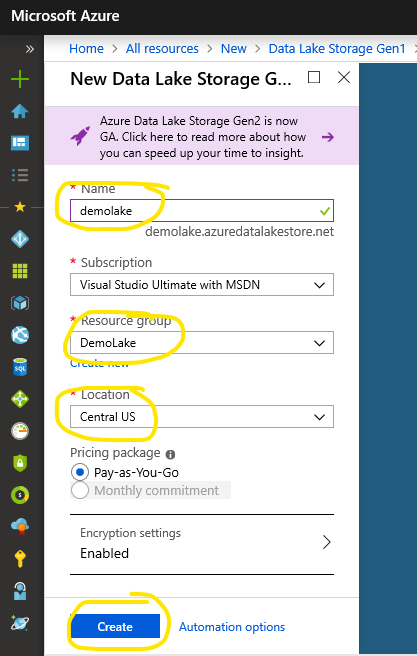
The name “demolake” was not taken so I jumped on that one, sorry about that. Maybe try “demonlake”? It’s available at the moment at the time I’m writing this. I chose my default subscription, my existing DemoLake resource group, and changed my location to “Central US”. (fig. 9)
I know you want to jump right in and create your Logic App, but DON’T! You should set up your data lake access before you forget. You don’t HAVE to do it now. You will successfully create our Logic App, but you will see errors when you finally test it because the Logic App won’t have rights to your new data lake.
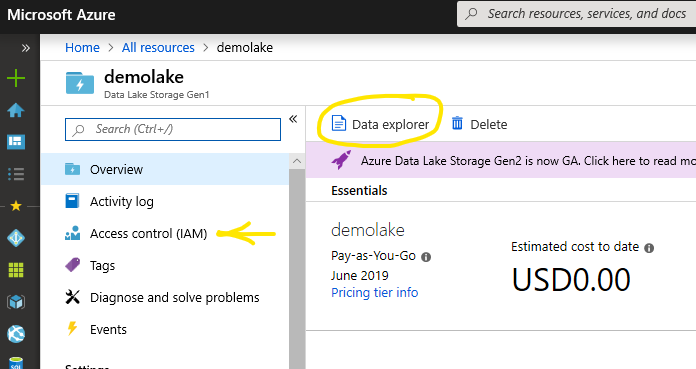
Your FIRST instinct might be to head to the “Access Control (IAM)” section, but that won’t get you access to the data in the lake (or write to it). The IAM section will allow you to set up standard Azure access to “manage” this resource.
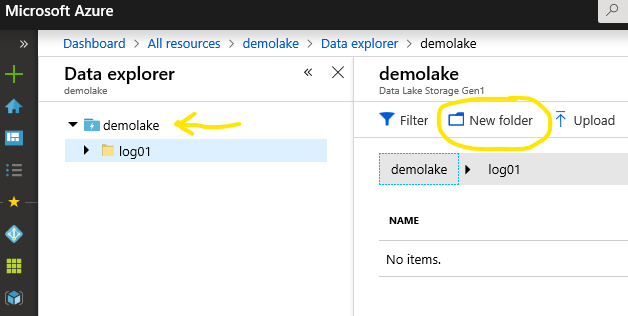
You must set up access in the “Data explorer”. (fig. 10) Once you’ve launched the Data Explorer, select the root “demolake” and then “New folder” to create a folder called “log01”. (fig. 11) This will also prove out our access to a “child” of the root data lake (setup in the next step). Since file system structure is rather important in the lake, keeping the data organized makes it easier to find and transform from its raw state into something usable.
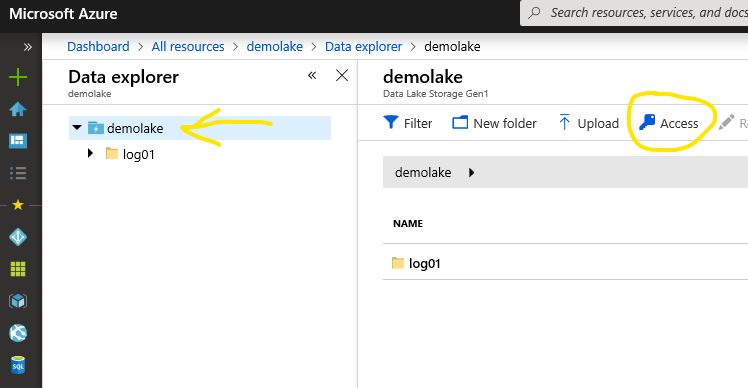
Make sure that the root folder “demolake” is selected and select the “Access” option which will add another form to fill out to the right in the standard Azure Portal fashion. (fig. 12)
NOTE: If you do this in the REVERSE order (allow access to root and include children, THEN create the folder) that folder will NOT inherit the access. My initial understanding of the option was that anything you create from then on would inherit from root, but it doesn’t. I got access errors the first time doing it the “reverse” way and I had to fix it.
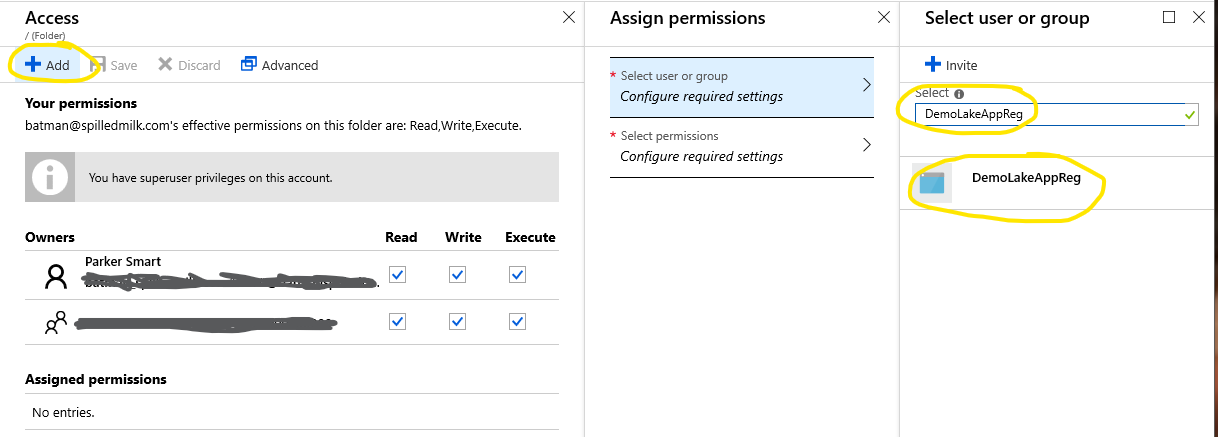
Search for the Application Registration which we created in the first step and make sure you “Select” it as well. There might be quite a few in your list, so searching for it might be quicker. (fig. 13)
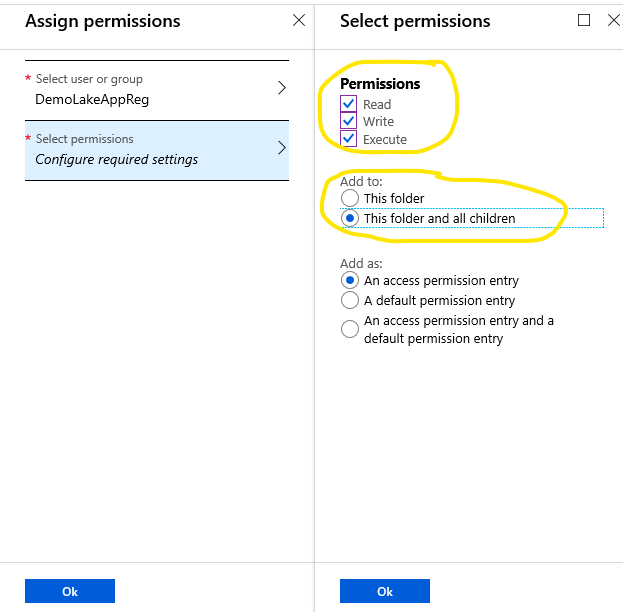
Once the group has been selected, you will be prompted with permissions. Go ahead and add ALL of the permissions and have them propagate to all of the children as well. This IS a demo after all. You can experiment with other permissions and creating permissions on individual folders later. Once you select “Ok” you will see your new “Assigned permissions”. (fig. 14)
Create Logic App
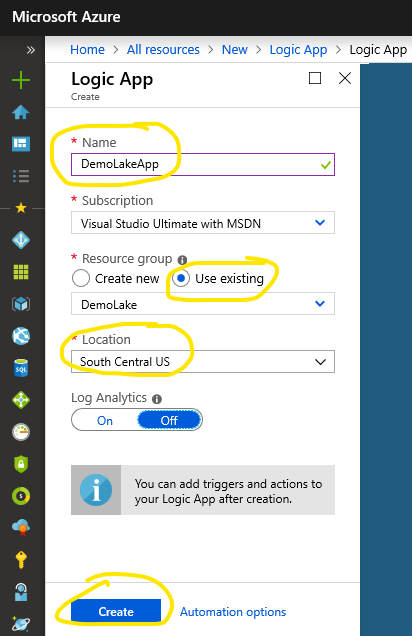
Search for “Logic App” in the new resource screen found by clicking the “+” in the left menu. Select the resource found and the form below will be displayed. (fig. 15) Fill out the form and create the App. Note that I used my existing resource group “DemoLake” just to be organized. I kept “Log Analytics” off just so I didn’t have to create space for them.
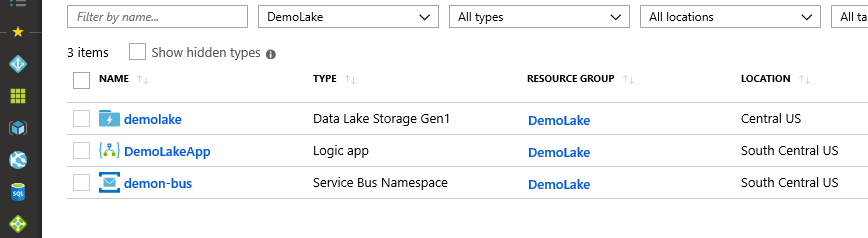
I now have my four resources (don’t forget the AAD Application Registration) and I need to flesh out the Logic App, because right now it does absolutely nothing.
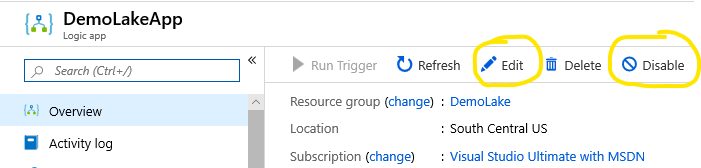
Select the DemoLakeApp. When the overview comes up you may see the “Edit” button disabled, because Azure is attempting to be helpful and showing you a bunch of templates from which to start. Scroll down and choose the “blank” template, because we can search for the one we want when adding the first step.
Make note of the Disable button (fig. 17), because that might come into play if you encounter errors or if you don’t “complete” your messages where they stay on the bus and are continually processed costing YOU money.
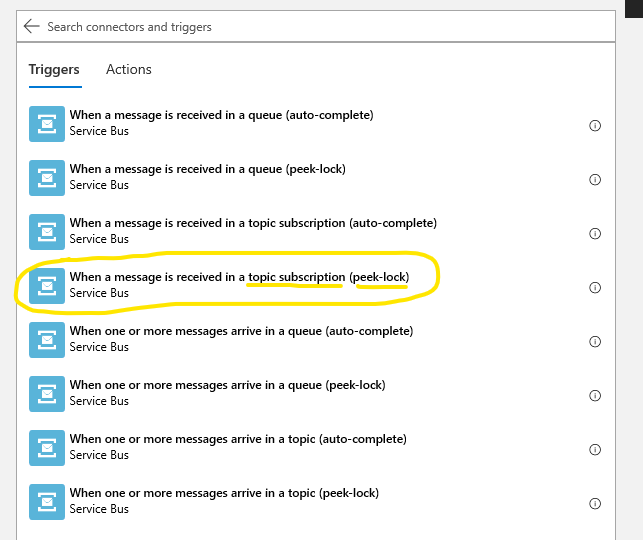
Search for “service” in your trigger step once you’ve chosen a “blank” template. “Service Bus” should be the first trigger category that comes up. It may not be the FIRST one, but it’ll be up there.
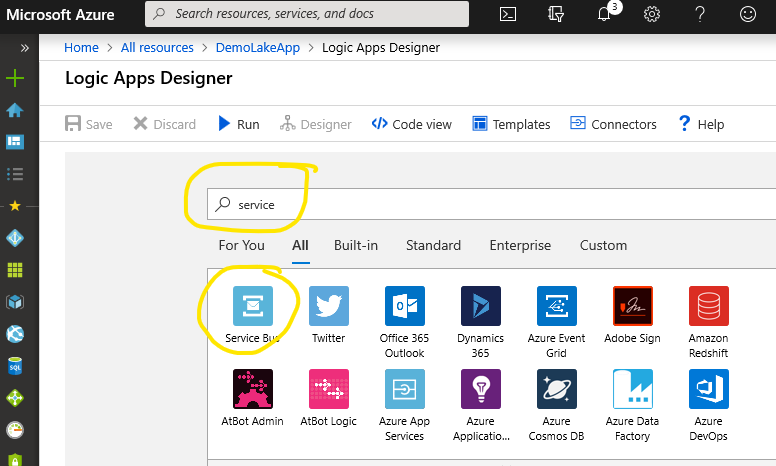
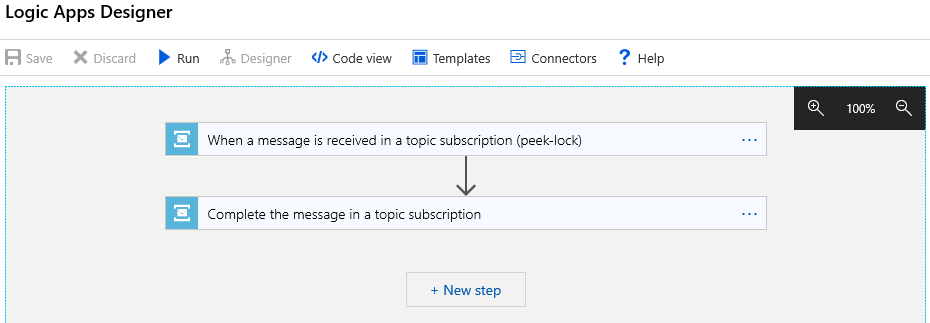
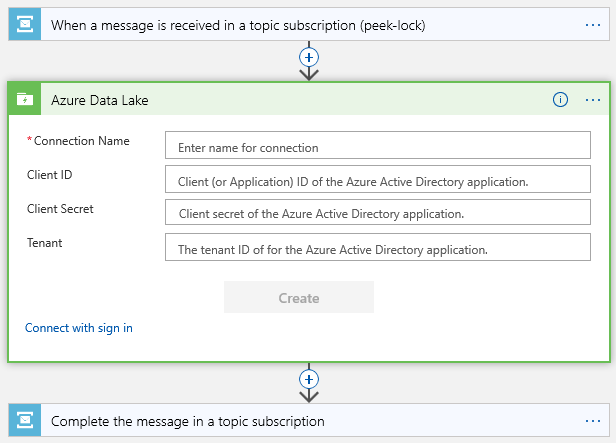
Select “Service Bus” once you found it (fig. 18) and you will be presented with the service bus triggers that will execute your logic app. Select the following option that is pictured “When a message is received in a topic subscription (peek-lock)”. (fig. 19)
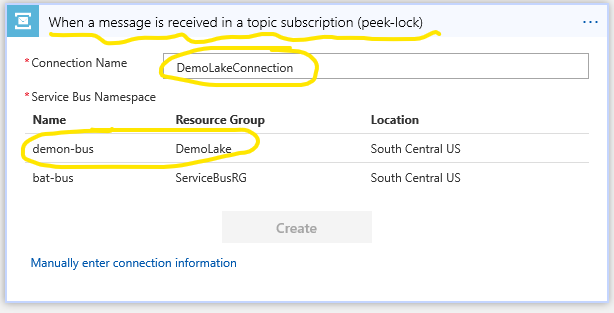
When you select the service bus trigger you will need to configure it. The Logic App Designer will prompt you to create a connection to the subscription. Enter a name, which will be a friendly name if you create multiple connections to this namespace and select the “Service Bus Namespace”. I chose my “demon-bus”. (fig. 20) When this connection is created, Azure will create an “API Connection” resource and automatically add it to my DemoLake resource group. It is viewable in the “All resources” view in the portal (just in case you feel like deleting it and creating a different one).
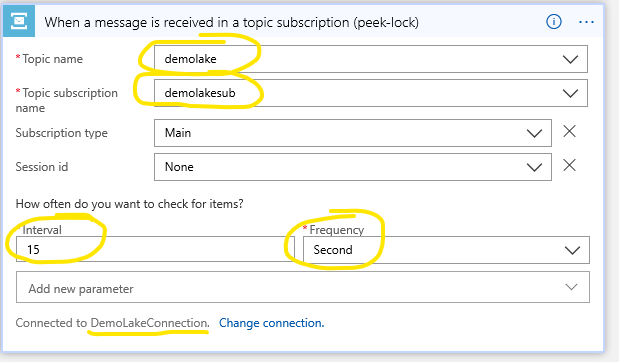
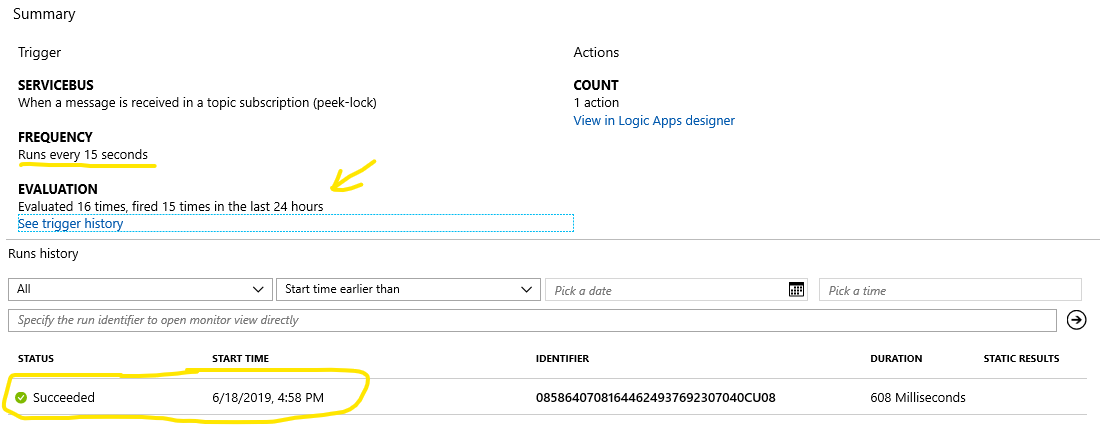
Now that the connection is created (or selected if you’re doing this a second time), choose the Topic and Subscription to monitor and pick a frequency. The Logic App will POLL using this frequency, but if there are no messages waiting in the Subscription then this trigger will be “skipped”. You will see all the successes and failures on the Logic App Overview screen and there is also a summary of each evaluation, including all of the skipped triggers.
You COULD jump right to creating the Data Lake step, but it’s a good idea to test the Service Bus Connection. You will need to add this step anyway, because successfully processed messages should be “completed” (removed from the Subscription queue). The designer even reminded you when you created that first trigger step since it was in “peek-lock” mode.
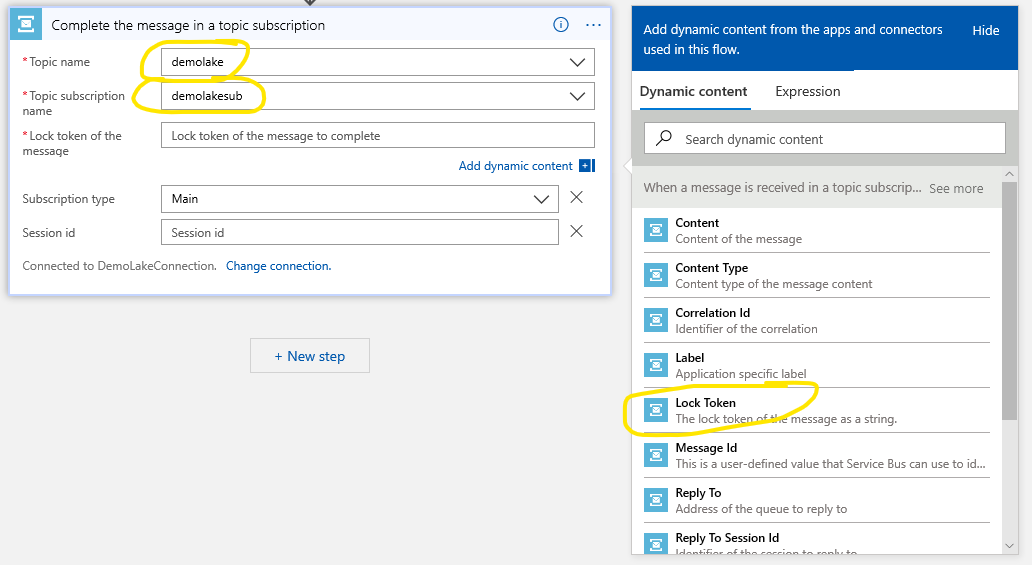
Click on the “New step” button and select the Topic and Subscription names from the dropdown lists. When you click in the “Lock Token” field the “Dynamic content” form will display and select the Lock Token. That dynamic content will be placed in the Lock Token field. (fig. 22)
Click the “Save” button and you will be able to run your first test. (fig. 23) Send a message to the “demolake” topic. Easier said than done, I know. Do you have a tool to do this? I built one using both the .Net Framework and a different one using .Net Core. If you have made it THIS far, and do not have a way to test your topic, then let me know. I’ll make the code available on GitHub. I use Service Bus Explorer written by Paolo Salvatori (of Microsoft) to monitor my Service Bus Namespaces.
Since you are familiar with creating Logic Apps, you COULD create a Logic App that sends a message to your topic to test it.
You can see on the Logic App overview page that I had a successful run. (fig. 24) You can also see that the Logic App triggered 16 times. When I set this up initially, I’ll admit that I went STRAIGHT to the data lake step which certainly makes things harder to diagnose when there are issues. It’s better to take smaller steps, not necessarily BABY steps, where you can incrementally verify this process.
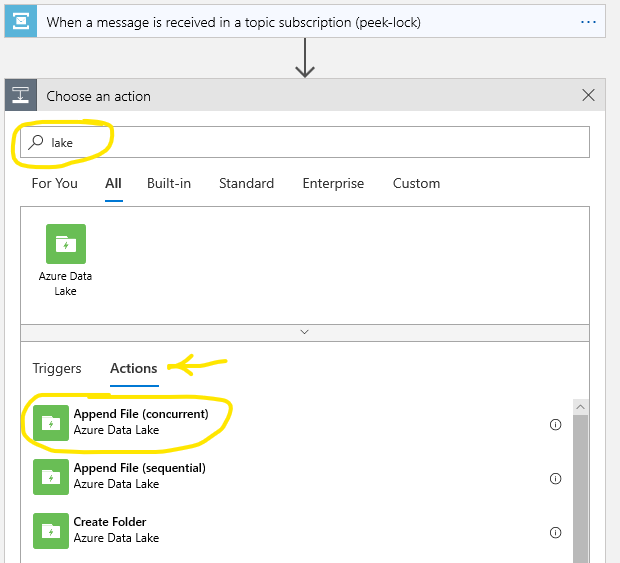
To get the message to the data lake you need a STEP to do this. I was GOING to say this is the “last” step, but it’s actually the SECOND step and we are just implementing it LAST. Semantics, I know. Launch the Logic App Designer, hover over the arrow pointing to the last step, and click that plus “+” button. The Designer will prompt you to add a step. Search for “lake” and select the “Append file (concurrent)” action. (fig. 25)
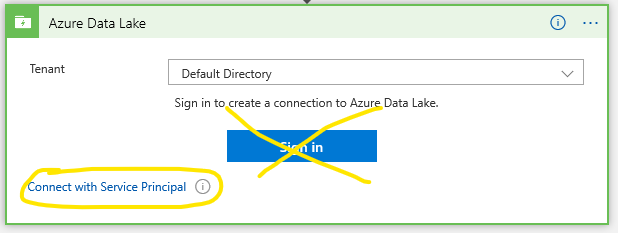
The Designer will prompt you to create a connection to the data lake. Initially I wanted to just go the EASY route, but the popups NEVER came up for me. Select the “Connect with Service Principal” link/button. (fig. 26)
All four fields are needed. For the “Connection Name” call it “demolake” so it matches your account name on the next prompt. (fig. 27)
Did you write those other IDs down or paste them into a text file? NO? Don’t worry, just launch another tab from the “Microsoft Azure” branding in the upper left and navigate to your favorite Azure Active Directory. Manage the “App registrations” which is in a picture WAY back at the beginning of this blog. Since you are a multi-tab master, if you need this picture for reference (fig. 4) then launch this blog in another tab and then scroll down a bit.
Select the DemoLakeAppReg where the Application (client) and Directory (tenant) IDs are listed in the overview. If you hover over those IDs, the copy buttons will appear. Copy and paste the IDs to their appropriate spots in the Azure Data Lake step. (fig. 27)
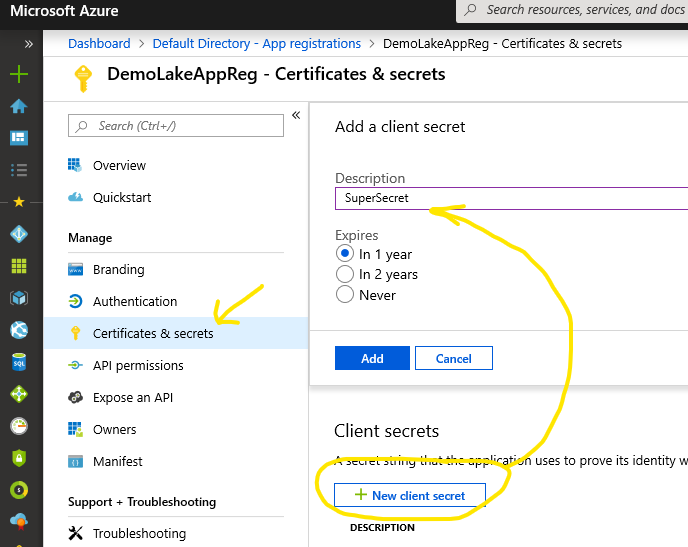
Select the “Certificates & secrets” on your DemoLakeAppReg and create a new secret. (fig. 28) Name it whatever you want and click “Add”. Once it shows you the secret, make sure you COPY it just like you did the other IDs and paste it into the “Client Secret” field. (fig. 27)
With all of the fields filled in, go ahead and “Create” the connection.
For the “Account Name” field this is ABSOLUTELY the name of your data lake. DON’T do what I did and just put some display name, but since I added “AccountName” as a suffix (BatLakeAccountName) the first time I was able to find my issue pretty quickly. This field MUST be “demolake” (or [insert data lake name here]).
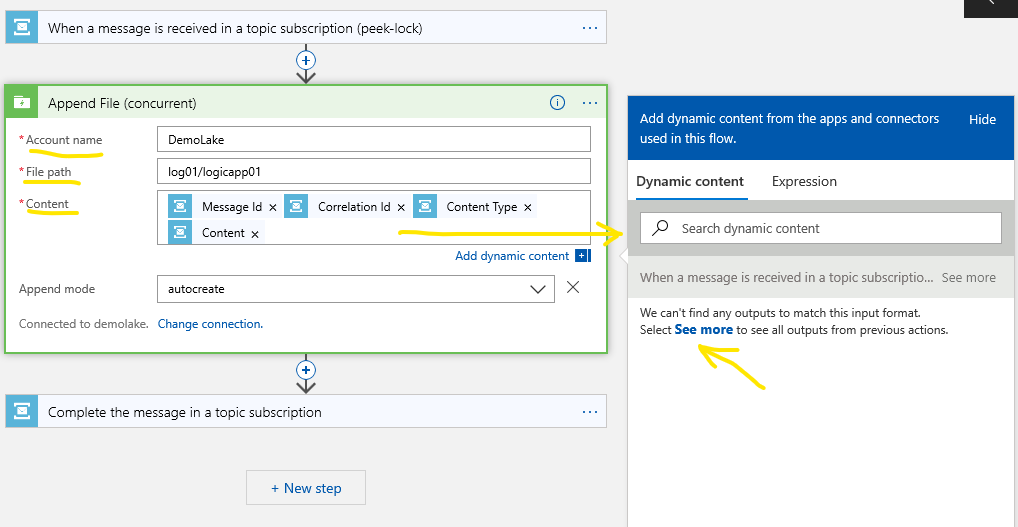
Enter the “File path” log01/logicapp01 which will append to a file in the log01 folder. (fig. 29) Add whatever values you like in the “Content” field. You can add dynamic content like you did when choosing the Lock Token above when setting up the previous Logic App step. (fig. 22) Since there is no dynamic content for the CURRENT step, selecting “See more” will show the fields from the previous step(s). (fig. 29)
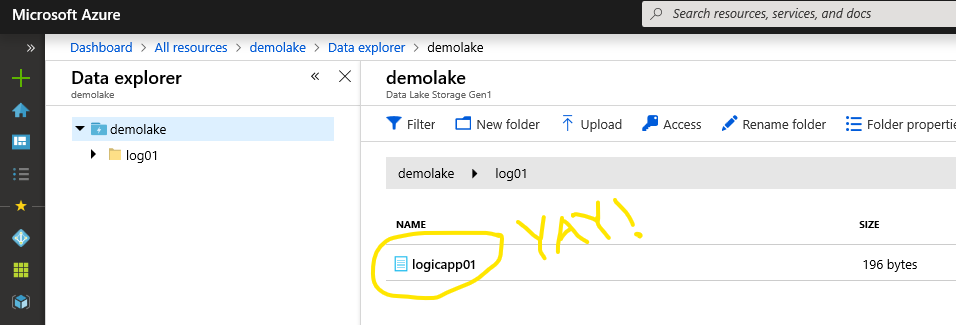
Make sure you save this and by default it is enabled, so if you’ve got messages stacked up in that Topic then they will be processed.. Run your message publish test and you will see the file in the log01 folder of your demolake. YAY! (fig. 30)
In summary… Well you can scroll up to the table of contents and get the gist of what’s covered. Oh wait a second. In summary, we created four resources and Azure created two API Connections to support the Logic App PLUS all of the topics covered in the table of contents.

You made it!! I hope that this has helped you as I had to do MUCH trial and error, as well as look at Microsoft documentation and a few other blog posts, some of which were VERY helpful and some were NOT. Good or bad, feedback is always appreciated.
Pushing Files to an Azure Web App Using PowerShell
The Point
I needed a way to push a file to my Azure Web App without having to add it to a Visual Studio project and then publish it to the website. Just an ad hoc thing to get a file (or a few files) out to that website for reference. (Now feel free to skip ahead.)
Getting to… The Point
I was looking for something that was already done, but I found a post by Kaushal Kumar Panday who suggests to use the PublishSettings that can be downloaded from your Azure web app. And then he goes on and uses FileZilla (which I don’t have on my work machine). I wanted it to be a script that I could just run, so when I update a file I could just run the script and it would get pushed up to the site. Maybe that script would notify the people that care about this file and they could download it, but that’s out of scope for this blog entry.
If you just want to start messing with things then you can scroll to the bottom of this post and download the PowerShell script and get started.

From the variables in the PublishSettings file copy and paste the URL (without the https://) into the $ftpUrl variable. You will also have to split the publishUrl variable in the settings file into the first two variables above. If the user name contains a dollar sign, that will need to be escaped with the back tick (`) so the name is not evaluated and you’re missing much of your user name because it’s blank.

The section above only is to let the scripter (person running the script) what the script is doing. (or is that scriptee?)
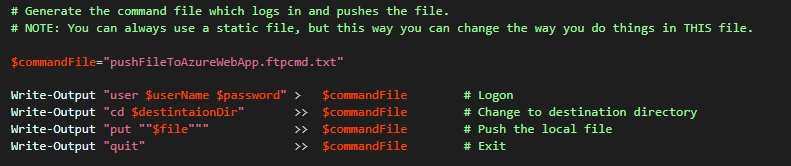
The FTP portion COULD be a static file, but I like to have everything contained within ONE file. I feel like it’s easier to manage that way. Of course it DID start out as a static file, but then I changed it so the “push” file script generates the FTP command file. This is where you could change things up and put multiple files (mput) or do other things out there on the server that FTP allows you to do. This snippet doesn’t do much other than logon, change to the destination, upload the file, and then quit.
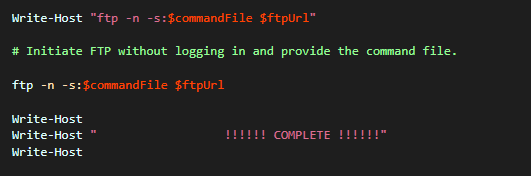
Once the file has been generated, then run the FTP command and connect to the website’s FTP server.
That’s IT! Below is a link to the sample file out in one of my GitHub repositories.
pushFileToAzureWebApp.ps1 on GitHub <<<<<<<<<<<<< If you’re skipping ahead. <<<<
I hope this helped.
Excel:=HyperLink() (or how to integrate your spreadsheet with Moovee Picker)
I initially put this together for Liem in an email so he could link the Moovee Picker page to his fancy spreadsheet.
The Basics:
- Your box office data is in a single column. (It could be in rows, but for this example the movie information fills down.)
- Your box office data does not move, because it will be referenced by other cells.
- You may create another sheet in your workbook to hide all the messy “calculations”. (If you do this then you’re familiar how to reference other sheets from your base sheet.)
Your Data:
The first sheet will contain your movie names (column A) and box office values (column B). You may have other random columns inserted, but for this example we only have three data columns. The BUX column isn’t really used, but mostly to show that the movie data is sorted properly and matches the sorting within Moovee Picker.

Note that cell A19 is selected and you can see the referenced HYPERLINK() function =HYPERLINK(‘MP Link’!A21, “Click for picks…”) where the link is referenced on the MP Link sheet and “Click for picks…” is the friendly name.
Data Transformation:
Since the hyperlink needs to be a long string of characters then this needs to be built using the =CONCAT() function which you can see is being used in cell C3. The movie name column is populated by using the sheet reference =Data!A2 from Black Panther [Saturday] and filled down to The Shape of Water. The same goes with the box office column; =Data!B2 and filled down.
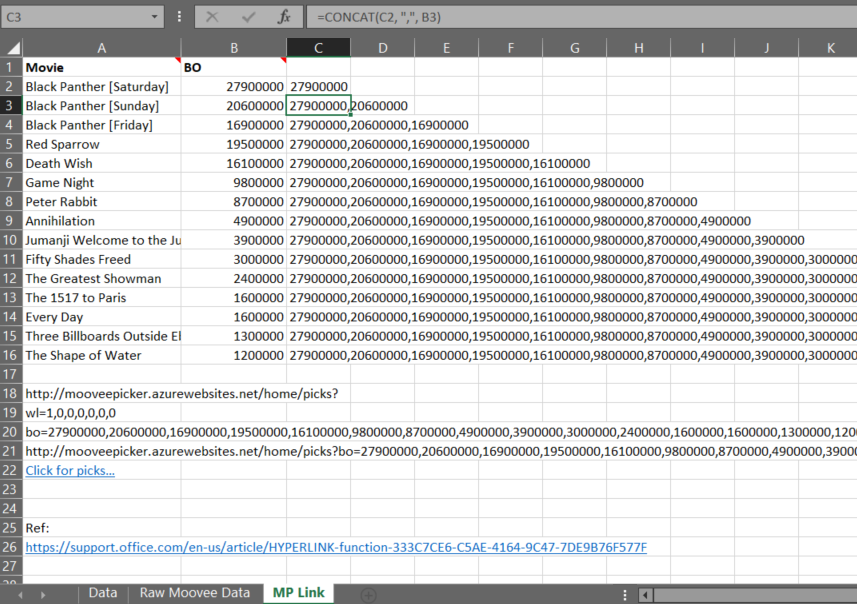
Since cell C3 is referencing the cell above it C2, cell C2 needs to be populated with cell B2 by just entering =B2 in cell C2. Cell C3 is highlighted because this is where the work happens. This cell contains the function =CONCAT(C2, “,”, B3) which references the cell above and concatenates that with a comma and the cell to the left B3 and the result is “27900000,20600000”. When C3 is filled down to cell C16 all of the box office values are concatenated together in the correct order. That was the hard part.
Piecing It All Together:
The function in cell A21 contains =CONCAT(A18,A20, “&”, A19) which concatenates the root URL (A18), the box office values (A20), a separator between the lists (&), and the weight list designating to only use the custom box office values (A19). Now cell A21 is ready to be referenced on the previous “Data” (Data!A19) sheet in the first figure.
“I have Excel, Just give me the workbook and I’ll sort it out.”
I hope this helps, I can always be contacted through Twitter or my email.
Denver Dev Day 2017 – Giving Back to the UWP Community
Step one, put down the controller… I’ve been REALLY busy. After Denver Dev Days then it was FULL BORE into Comic Con mode. And I had to do THAT blog (because I said I would) pretty much right after the con otherwise I would forget things. At least with this blog, I get to follow along with the slides as I hope you’re doing too.
My talk was part of the June, 23rd 2017 Denver Dev Day. I thought I was going to type up a blog BEFORE the talk as practice and get my head straight, but that didn’t happen since Comic Con was looming in the distance as well. So this blog is more of what I talked about, more or less. And YES it’s incredible that I’m doing ANOTHER blog merely DAYS after the Comic Con one. I think that affords me a LEAST a year off from blogging.
You can download the entire project or JUST the Power Point slides from this GitHub repository.
https://github.com/SpilledMilkCOM/DenDevDayUWP
Go ahead and SKIP that first slide. Well at least GLANCE at it since they DID sponsor the event. If you’re not familiar with my speaking style, I tend to put things in all caps for emPHAsis. It’s too hard to ctrl-B twice for bold on and off when the caps lock key is easier to hit. So don’t think of it as shouting unless the entire sentence is all caps.
Slide 2 – Giving Back
This was a general overview of what I’d be talking about. About my journey to contributing to the UWP Community Toolkit out on GitHub.
Slide 3 – Emmet Speech
https://www.youtube.com/watch?v=p2NQdtNbqUE I included Emmet’s Speech to level set people.
YES, it’s true… I may not be a Master Builder.
I may not have a lot of experience fighting, or leading, or coming up with plans.
Or having ideas in general.
In FACT, I’m not all that SMART.
And I’m NOT what you call a creative type.
Plus… Generally, unskilled.
Also… Scared and cowardly.
I know what you’re thinking. He is the LEAST qualified person in the world to lead us. And you are RIGHT.
There was about to be a buuut.
I watch this video quite a bit. Emmet really doesn’t think he’s all that special, which in reality with respect to the universe we’re all pretty tiny and insignificant. BUT in the end we end up actually kicking ass and BEING The Special.
Slide 4 – Technically I’m Not Exactly a Master Builder Yet.
At the end of that movie you get to meet the boy’s dad. Holy CRAP!! I’M that DAD!! Aaaahh!! I like my stuff in its place and if you use it then PUT IT BACK! (that was shouting).
This talk was supposed to be a lightening talk, but I think they did away with those and Shawn asked if I could turn this into a full blown 75-minute talk. SURE! I think that email that was approving speakers was about 2 weeks before the talk so I had some WORK ahead of me.
You can’t know EVERYTHING. Just like Emmet said “In FACT, I’m not all that SMART” And there is ALWAYS somebody out there that knows more than you do, so it’s better to be humble and show your skills by DOING and not talking about them.
The Lego Movie is NOT JUST a movie, but possibly a metaphor for LIFE!
Slide 5
Ah yes, the introductions. I’m old. I was one of two people at Mines that owned a Macintosh which put me in the default position of Mac Evangelist. I worked for Apple for the duration and I taught classes and showed that I could do everything on my Mac that everybody else could do on their TI PCs (except for display in color). My Mac could plug into the Motorola 68000 boards in the Green Center and I could download the Morse Code interpreter right from my machine. AWESOME!
Somewhere I caught the Windows bug. I was introduced to SO many other windowed systems at Intergraph that I got used to resizing my windows from any edge. When I got back to my Mac at home (now a Mac IIx) I was not able to do this. It was always a combination of moving the window and resizing. PLUS, Macs were (and still are) pretty damn expensive and I didn’t have my student discount anymore.
My title at NCM is Enterprise Solutions Architect, but I feel I’ve done the same things since I’ve started there 10 years ago. I solve problems, help people, and learn new technology and put it to good use. Sure, my title has changed over the years and more projects under my belt, but I just try to come to work and kick ass every day.
Don’t forget to download all of this from GitHub. https://github.com/SpilledMilkCOM/DenDevDayUWP
Slide 6 – Table of Contents
I pretty much read this over and touched over each subject. Remember, you’re supposed to be following along with the slides. This is mostly to prepare people for what’s coming up.
Slide 7 – Goals
Certainly I’d like to inspire MORE than one person to help the UWP Community, but maybe that is a tall order. But maybe you’ll help ANY community and that’s JUST as good in my book. You know, like that annoying shampoo commercial. You tell two people and they tell two people and so on and so on and so on… Yeah. THAT annoying commercial.
Slide 8 – What This is NOT
It’s not my goal to help people with UWP, GitHub, or Twitter. I pretty much just read the slide on this one. Are you following along?
Slide 9
There certainly is NEVER enough time in the day. Even with this blog. Will I finish it tonight? Why would I help out the community?
Had to take a vacation day for this talk. My company doesn’t pay me to do this. It just felt right to give back and do this talk as well as the one back in October. I figure I know some stuff and doing these Denver Dev Day talks is a great way to give back to the programming community.
It feels good to give stuff away. Write a free app or website or give stickers away at Comic Con.
I would say the major reason I gave back to the community was that I needed the functionality. It was GREAT that MOST of the functionality was already in the toolkit, but I needed latitude and longitude on Tweets so I put it in. Even if you end up giving back for purely selfish reasons that’s STILL giving back. I would say that’s been my driving force for many of the times that I’ve given back. I was HAPPY to do it. There was so much that I DIDN’T have to build, because there are others that came before that gave back.
The running joke at work is “You’re royalty, why do you work?”. I’m 9 generations away from King Kamehameha 1st
Slide 10
Well it all started with GitHub. I signed up last year some time. It’s a great place for your offsite backups and small projects to share with the world and collaborate as well. I was working on a .Net Core project for work and I noticed that the DataTable was deprecated. I needed a way to send a User Defined Table Type as a parameter to a SQL stored procedure. THAT’S where I found the N-RECO repository. I needed that recordset object so I grabbed it. I needed a way to set up the object using the CodeFirst / attributed syntax so I wrote a snippet of code that helped me do that and then used the Nreco recordset to get me the UDTT I needed to send to the Entity Framework Core stored procedure. I ended up sending that snippet back to the Nreco people and they gave me a contributor’s credit.
THIS of course was WAY out of process. No pull request, no merges, no nothing. Sorry about that. BUT… Giving back is giving back.
Slide 11 – A Little History Lesson
So it didn’t JUST start with the Nreco repo. As far back as I can remember I’ve been giving back in the form of code. My step brother and I REALLY wanted a new Apple ][ plus so our promise was to write software for our parents AND of course play games on it. We ended up writing a power fence inventory program for them in BASIC. Ugh. I remember there were NO numeric formatters so we had to write some so we could have trailing zeroes on the invoices. That was probably the trickiest part. It was all A B C menu driven, pretty “basic” stuff (pun intended).
Working at Intergraph I helped with a proof of concept using XmMotif. All of that code came from M.I.T., but there was some wonkiness to it and needed some minor tweaks. I don’t know if any of those changes made it back to M.I.T., but I like to think so.
When I needed comic book shop data I turned to The Master-List website maintained by Mark. I wrote my first screen scraping bot to gather up ALL of the data I could from that website and put it into, ahem, an Access database. This was back in 1997 and all I had access to was Access so I dealt with it. When I got a hold of Mark, he said he maintained the data just by editing the HTML pages. I GAVE him all of the data that I gathered and sent it to him in a spreadsheet. I didn’t have time to redo his website for him, because my HTML skills were still pretty basic. I keep in touch with him and I think he’s still doing things the old-fashioned way.
Another screen scraping bot that I built was to hit eBay. I wasn’t sure what comic books to sell so my bot would scrape eBay and look for the items that I had and cross reference that with what was selling, when, and for how much. This was back in 1998 and I thought I could help eBay out. It was REALLY hard to get a hold of them back then (and it STILL is today), there was only ONE conversation where I basically told them what I was doing. I wasn’t expecting much. They didn’t follow up after that conversation. They were either working on tools like that or NOW they were GOING to. Since I didn’t see tools like that show up until MANY YEARS later, I figured they were firing up that branch of eBay to work on those analytics for sellers like me.
The sticky Tweet? Maybe Twitter was already working on something like that, but it took them a while to get it done. I tweeted that I wanted a Sticky Tweet (MY pinned/sticky tweet now) back in 2013, and a few years later I saw that they implemented it.
Slide 12 – WWJD?
Part of why I started doing the talks was primarily due to Jerry Nixon. What would JERRY do? He is always SO enthusiastic about Microsoft technology and about tech in general. He donates his time to the Visual Studio User’s Group and is always there for those Microsoft functions. I’m sure it’s in his job description, but there is a TON that he does outside of that box. So I’ve GOT to thank Jerry for that inspiration. Unfortunately, he was not in the room when I said all of that. I had an extra Star Trek pin that was stuck to my college work out bag back in the day, and I gave it to him. He IMMEDIATELY put it on and wore it all day.
Slide 13 – Follow the Process (or don’t)
After integrating the UWP Toolkit into my code and realizing that I needed latitude and longitude, I forked the toolkit repo and got to work. I made sure that I followed their style and did not break any API. Things were up and running in only a couple of hours due to the fact that SO MUCH of the infrastructure was already there. I also updated the sample program that would allow you to enter a lat/long combo OR you could use the location services to find that for you. In their tweet list display I also added the lat/long there if it was attached to the tweet.
I submitted the pull request and begged for forgiveness. As it turns out the PR was nearly PERFECT. I missed the part of updating the documentation since I didn’t really know where that was. If you look at their guidelines you should submit an ISSUE FIRST, which is something that I missed because I didn’t read the guidelines.
The UWP team allowed me to keep going and I was able to submit an issue and then provide another update. I’ve got more plans for this section of the toolkit and will contribute as time permits. Both pull requests are in the links below:
• https://github.com/Microsoft/UWPCommunityToolkit/pull/714
• https://github.com/Microsoft/UWPCommunityToolkit/issues/727
Slide 14 – Ways to Give Back
If you stumble across something that blows up or just doesn’t feel right take the time to report a bug or provide feedback. It doesn’t take that long and it help tremendously. I am now part of the Alpha group on the Xbox OS release schedule and I’ve been submitting things for a while now. I’m sure I would not have made it to the Alpha group if I had just kept my mouth shut in the previous groups.
You could mentor at school or work. I’m sure that ANY school would love to have somebody representing the software industry come talk or teach some extracurricular activities.
You can always ask Jerry or Shawn and submit yourself when they “call for speakers” either for Denver Dev Day or at the User Group meetings.
Free stuff is always nice. Write an app and GIVE it away!
Slide 15 – What Would YOU Do?
I polled the audience to see what they might do to give back. Reporting bugs seemed to be the easiest way to give back.
Slide 16 – Questions / Contact
I just wrapped up with questions and I forgot what questions were asked. I think I finished up with about 3 minutes to spare and we could all hit lunch a bit early and get a jump on the lines.
Denver Comic Con 2017
I REALLY want to try to keep this to two hours. It’s already 7:15 and I don’t really be up late to try get this out. So hopefully I’ll post this around 9:30 or maybe in the morning.
So it didn’t start out well. Starting with the 7-day invoice with ZERO grace period. Who does a 7-day invoice? And WHO doesn’t make note of that in the subject or body of the email, preferably in ALL CAPS. YEAH!! (That’s yelling versus my normal emPHAsis mode). Getting put on the wait list. Notified that I didn’t make the wait list in April. THEN finding out there is some sort of lottery a bit later. WHY wouldn’t I just be automatically enrolled in the lottery? Yeah, I dunno either. So I fill out yet ANOTHER form and then wait… I find out that I win about three weeks before the con so I’m thinking, CRAP, I need to at the very least get stickers since I’m out. I was totally expecting to go as a fan/exhibitor. I was able to grab some exhibitor passes from Monte. That guy is a damn ROCK! Twenty years and STILL SOLID.
 The stickers turn out AMAZING. I’d like to plug www.UPrinting.com for that one. I had been saving a 20% off code since LAST year and I was finally able to use it. I had to go vinyl this year because the ones from two years ago were just the “indoor” kind. Put them on your car… Two weeks later… You’ve got a white sticky mess on your windows. Let it endure the elements of the winter and spring and you’re scraping that crap off with a razor. So far so good. Those stickers are STILL looking good after about a month.
Thursday I head downtown and up the convention center parking spiral. I’m following the signs all the way up and then MORE signs ALL the way to the BACK. About 20 cars are parked there so I figured I was in the right spot. I have to remember my stall in order to pay and of course I forgot so I go back and look. I’m 3418. Something like that, but I don’t have the receipt in front of me at this moment.
I’m on autopilot and head to where I normally go for badges and registration. I’m getting funny looks from the suits all dressed up. WHAT? There is some damn “hydro” convention here? I see a DCC volunteer and he’s JUST as lost as I am. We find ANOTHER volunteer, but she looks like she knows where she’s going. Meanwhile, I’m carrying stuff. The two pull up vertical banners on my shoulders and the large display box and the other long table banner box. WAY more carrying than I wanted. I FINALLY get to my table and I see the freight elevator. PERFECT! I head up to P3 and walk out expecting my car to be right there. Oh no, it’s CLEAR at the other end. Those OTHER cars must have been for that stupid hydro conference. How lame. I go get my car and pull it closer. NOW PERFECT!
 A quick carry to the table and back up to the car. Easy peezy lemon squeezy. One more trip down and I go to check out the con…
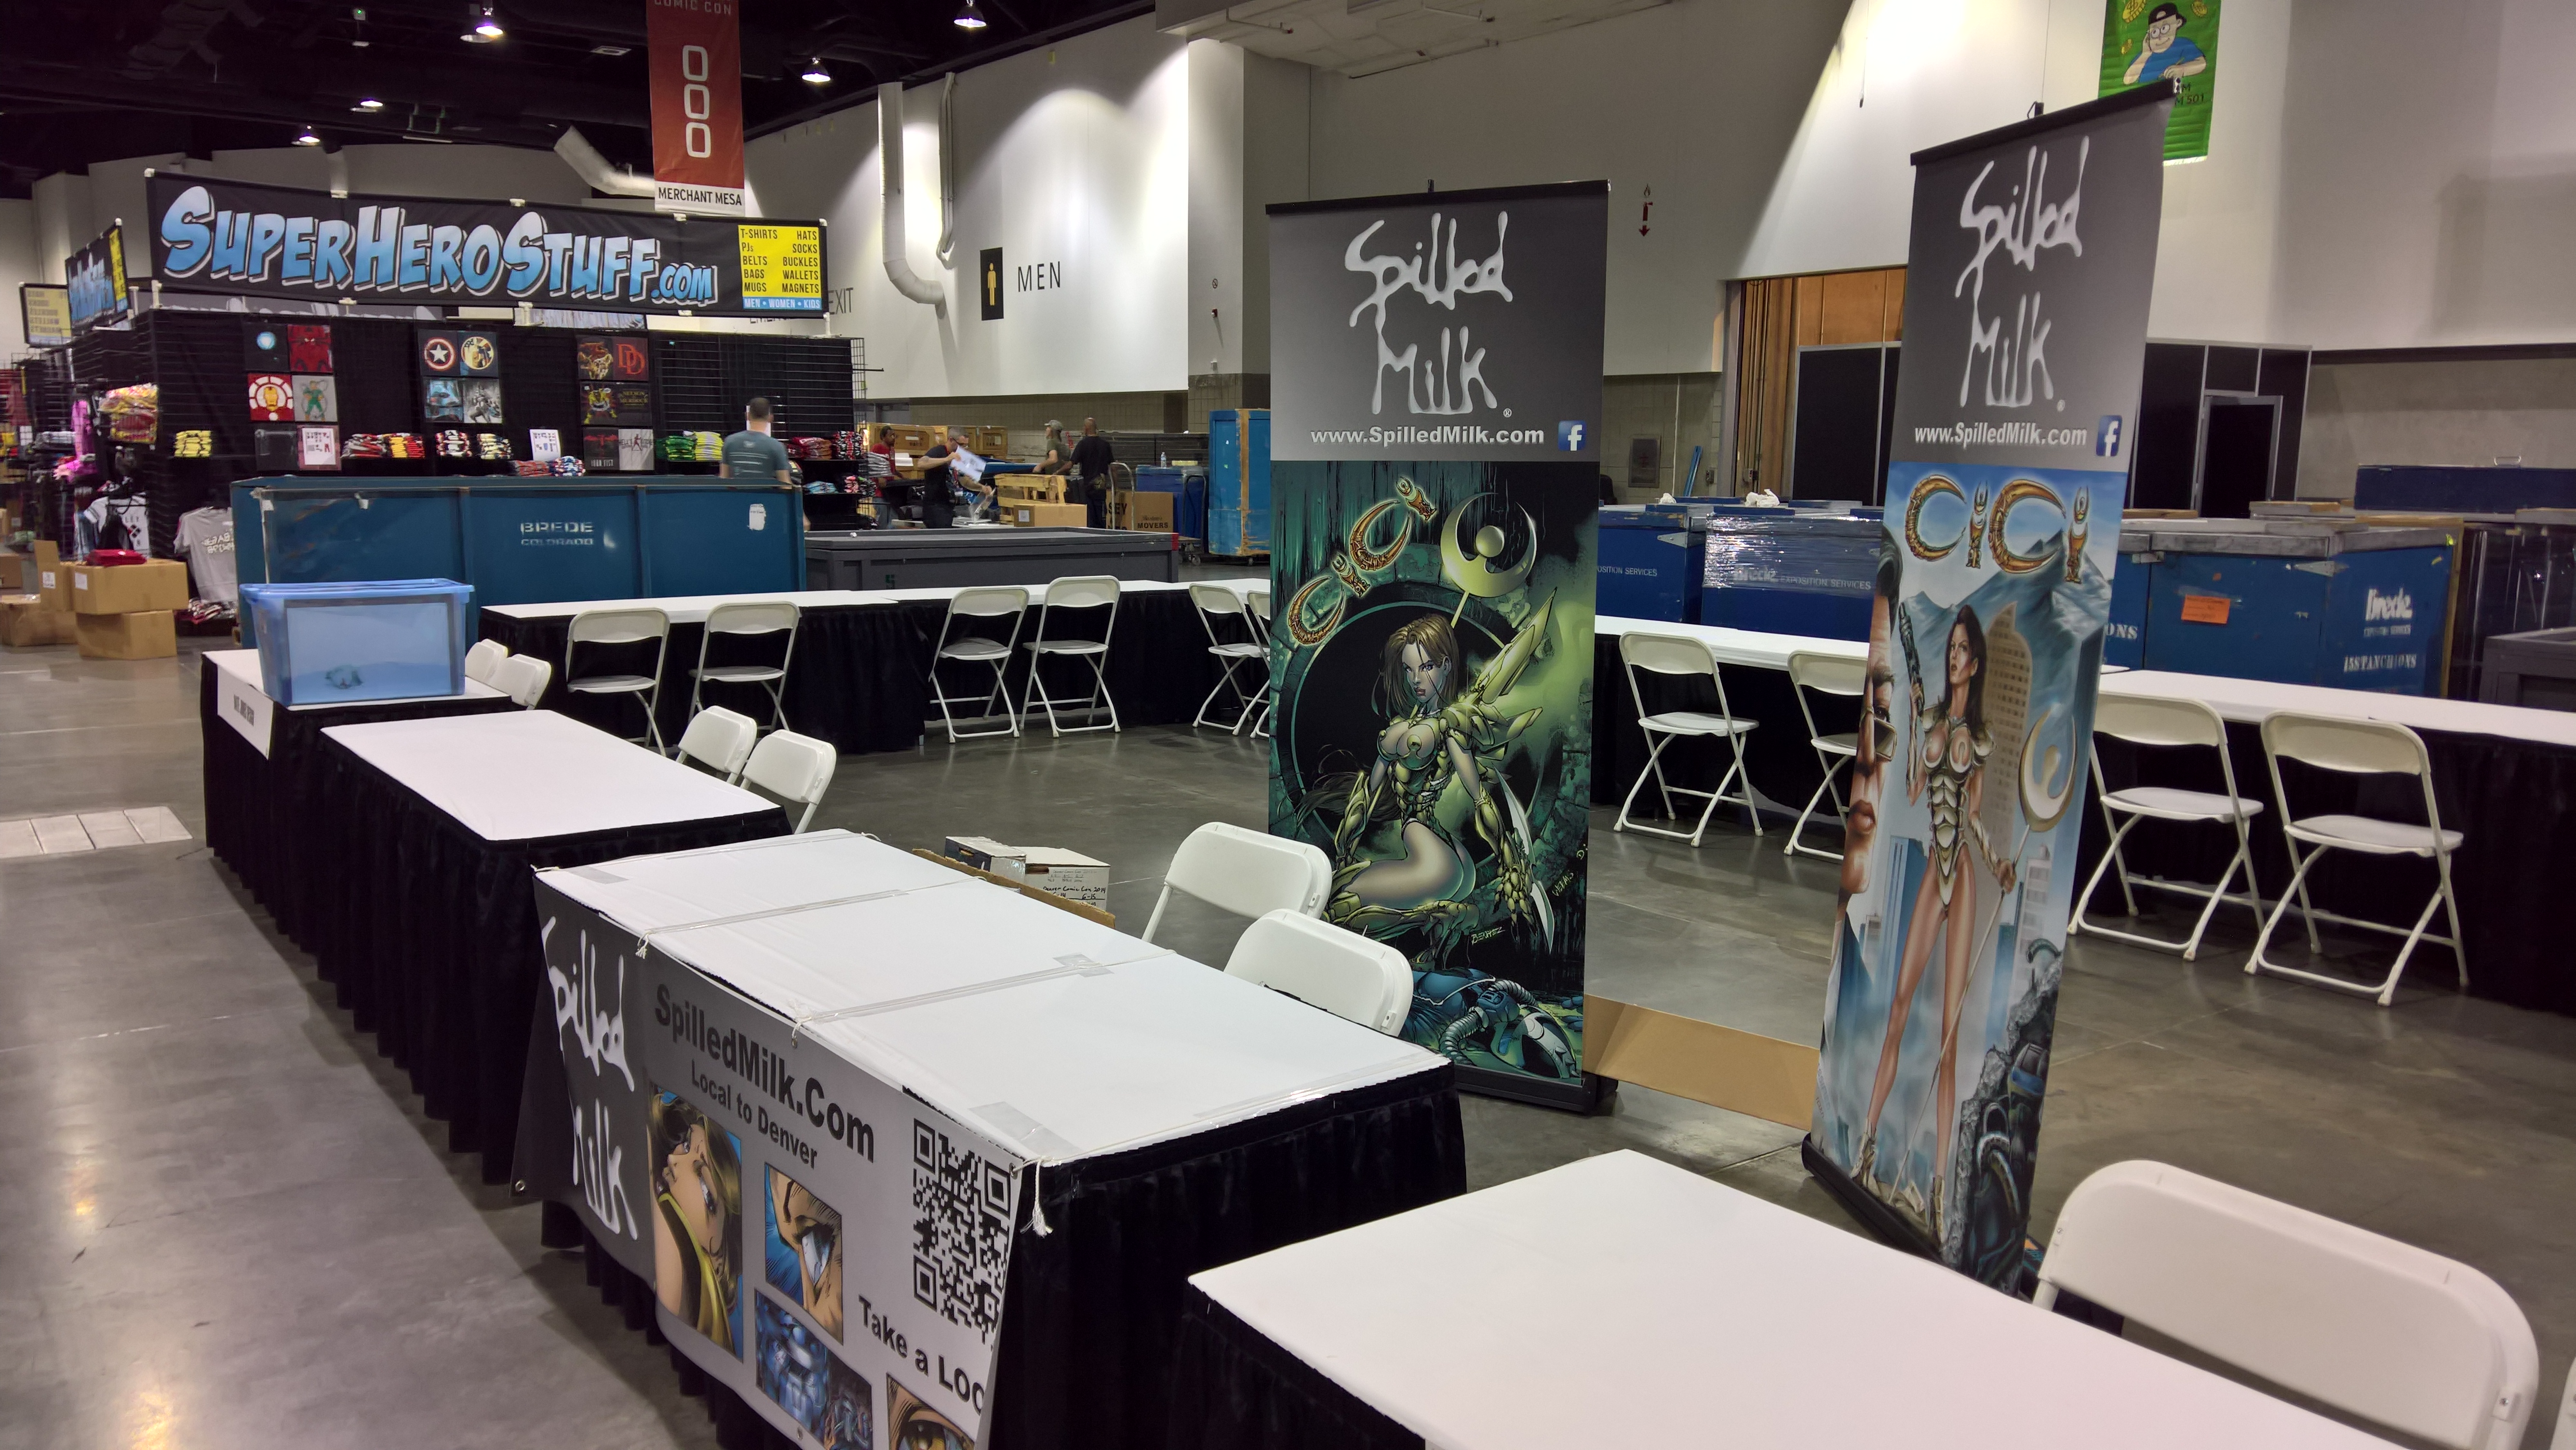
Now I see the con from a TOTALLY different vantage point than you fans (unless you’re an exhibitor reading this). There’s only SOME hustle and bustle from other exhibitors setting up or fork lifts bringing boxes to people’s booths. I kind of like this vantage point. I can get the lay of the land and scout out certain land marks. The floor felt a bit smaller than last year and it turns out it was. Many of the other exhibits were OUT of the main hall and in the halls of the convention center itself. Weird.
I was able to swing by Monte’s booth and say hi. I almost blazed by the Mile High Comics wall, but then I see William Moulton working tirelessly. Everybody else is at lunch. When I mention the size of the floor, Will says that’s it’s considerably smaller. Not sure the exact difference, but I get it since many of the exhibits are out in the halls. I take some pictures of booths that catch my eye and then I head out to my car. Less than two hours to do all of that so I was pretty happy with that.
On a high from setting up so quickly, I get in my car and notice a ticket on somebody else’s car. I think, “aw bummer, probably didn’t pay like last year”. I don’t think I paid for my unload time since there were signs NOT to (at least I think so). Then I start up my car and I see a ticket on MY windshield. “AW F&@<!!” A $50 dollar ticket and I PAID for parking!! It’s $12 for 8 hours and I was there BARELY two hours. The ticket said “no in and outs” and I didn’t pay for stall 3300 (I’m SURE of that number because it was the CLOSE one). So starting out; NOT even on day one it’s $62 for parking. AAAHHH!!
Friday morning. I’ve taken the day off to be at the DCC. There’s SOME traffic, but there’s only some slow down around Hampden. I take the exit and head down 13th to Champa and I’m IN. Spiraling up the parking structure and heading for P1 this time. A HUGE line to pay for parking and I think to myself “I’ve ALREADY paid for parking two or three times over!” The line was only about 10 minutes. I head down to my table and my neighbors are all set up, but there not at the con yet. Maybe they are and wandering around, but it didn’t look like it. I drop my bag and head over to the DCC merchandise booth, but I’m too early. They haven’t fired up any of the tablets and got them connected. The said come back around 8:45. So I wander around to take some pictures (many of these are on the Spilled Milk Comics Facebook Page).
 After wandering around taking pictures I head back to the DCC merch booth to get my beer glasses. This year the Breckenridge brew is called “I am Brewt”. I don’t remember when the voting was, but I think I missed it this year. They were able to use me as a guinea pig because many of the clerks didn’t know how to ring anybody up yet. They were having some deals which were actually pretty good so I got 3 beer glasses and 3 of the taster glasses. Unfortunately, the tasters only had the “I am Brewt” logo on the glass and NOT Groot.
The con doors were gonna open at 9:00 for the VIP’ers so I headed back to my table, taking pictures along the way.
I meet my neighbors when I get back to my table. Tammy (who prefers to remain anonymous to her readers), goes by Corgli Creator aka CC. I didn’t think that was weird at first, but now I do. WHY wouldn’t you want to take credit for your cute little web comic? I dunno.
The neighbor to MY left (or right if you’re facing my table) was Nen Chang. Well at least her artwork was my neighbor. Nen was on vacation with her family and her personal assistant Julie was there to hold down the fort and make the sales.
BOTH of my neighbors already had a pretty HUGE fan base so there was quite a bit of traffic to their table and I TRIED to give these people stickers and do my 30 second plot synopsis. People would rather pay $20 for a single small print than $10 for a complete miniseries (96 pages AND covers). I don’t get it. NOW indy publishers are charging $5.00 per comic. DAMN! Printing certainly has gone up, or they are doing extremely LIMITED print runs.
Quite a few people stop by the table to see if I have anything new. My response is that I’ve got a screenplay in the can that took about two and a half years and starting on a new one with Matt Haley. I COULD bury the logline here, but that will most likely be a separate post. You can certainly ask. The “logline” is the one sentence blurb explains the movie which you’ll see on Netflix or DirecTV.
When people stop, I will ask them if they want to hear the 30 second plot synopsis. MOST people said yes, but there was this one dick that said no. What a total dick. What do you say to that? I said, “ok, just keep flipping through pages.” Eventually he walked away. When people said YES, then I’d start in with:
The main character, CiCi, is a clone. She was cloned using nano-technology. The tech stayed inside her which creates her weapons and armor and also preserves her memories and emotions. Her background is fairly religious and the CLONE has issues with this. She’s not sure if she has a soul and is troubled by the fact that she was created with tiny little robots. She teams up with another clone, Max, and they try to take down the corporation that created them. It’s a four-issue miniseries. A complete story arc. All FOUR issues for a MERE ten dollars. (my hard sell at the end) Is that 30 seconds when you read it out loud? Maybe read faster?
This year, not many people purchased. That’s ok. I wasn’t expecting to be there anyway. There are SO MANY choices that people hedge their bets and move along.
My MAIN point of being there THIS year was to have a spot for NEXT year. I don’t know if Matt and I will be done by then, but there’s not rush.
 I took pictures of cosplayers where I could recognize the character (or at least I THOUGHT I did) and/or I liked the character. Turns out there were a few characters that I thought were Kingdom Hearts and were Final Fantasy or some other anime. I’d leap from my table and try to get a picture of people in front of my table. That would typically get a few other people to take pictures as well. As it turns out my Spilled Milk logo will be in their pictures too! I wish I was more organized about this, but cosplayers typically don’t like to carry too much because they are already carrying a giant weapon or accessory. I’d just hand them a sticker and tell them to find the picture and hopefully they would share MY picture, complete with the Spilled Milk logo in the shot. Why not? It’s a cool logo. 🙂
I was able to talk to Buzz for the longest time. He was there pretty early and he was riffing pretty good for so early. DAMN! He is TOO FUNNY. I hope to circle back with him after the con get a CiCi pinup.
I talked with Brandon Peterson for quite some time too. I don’t remember what we talked about, but he was drawing an AWESOME Medieval Spawn / Witchblade sketch cover. He was using water colors and doing an AMAZING job. Go Brando!! I think I gave him the set of CiCi comics I had. Maybe I’ll get a commission if he’s got the time.
I talked with David Mack only briefly as well as Frank Cho. I KNOW I gave them both comic sets. I got a few prints from Frank and David’s Daredevil hardcover. They signed everything and my con was complete.
I also was able to talk with Nick Nixon who is another publisher. HIS take on things is to sell advertising and make enough to be able GIVE the book away. Hmmmm… I like his take for sure. Check out his new project Gun Safety for Kids. It looks FUN!
Another shout out to Russell Nohelty of Wannabe Press. This guy is doing the right things for independent press. We walked the halls of the DCC in the morning (Sunday morning?) and he was handing out sketch cards with the Wannabe website and logo on the card. AWESOME! Free marketing when somebody shares that card on social media.
I’ll be posting the pinups when I get a chance to scan them and talk about meeting each artist. At least as much as I can remember. I should be getting back to fixing my website and try to bring the search status back up to #1 like it USED to be. Or getting to sleep. This went over about 10 minutes, because I had to load in pictures. I don’t know what my words per minute are, but I type pretty damn fast when I get going.
Please go visit the Spilled Milk website www.SpilledMilk.com (this also serves as a track-back to the site which hopefully will improve my search ranking).
Endless / Infinite Scrolling using jQuery and .Net MVC
There is no need to rant here, because I got that out of the way in the previous post. THIS is PURE code and examples.
Some background… I had old school page controls on my website, because I wanted something to work and I didn’t want to have to figure out HOW to do this fancy scrolling thing that all the new kids were doing. So it worked for a while, but then people started using my site… Shameless plug: www.CheckOutMyStuff.net
So if you’ve made it to this page, most likely I’ve directed you to it because the Word Press search meta data haven’t been that great. Plus, I don’t have the clout to post on StackOverflow.com, because I DON’T BLOG much. This has been addressed in the previous post/rant.
Since I want to keep this simple I’ll start from the bottom up since the tinier morsels are at the bottom and the grand finale Java Script is at the top. I also expect that you
already have an MVC project up and ready to go. This blog post does NOT go over how to create a .Net MVC project.
The Java Script code is pretty generic so it could be used to query ANY endpoint that returns JSON.
Ground Floor / Data Model
Let’s say you have some data you want to display in on your page. You will need a model object so it can be displayed, and you’ll probably have quite a few since you want to scroll
them. I have a “Stuff” model where most of the data I want to display and Id is used for building links, etc.
namespace SM.COMS.Models
{
public class InfiniteScrollingStuff
{
public InfiniteScrollingStuff() { }
public string Description { get; set; }
public string FullName { get; set; }
public string Id { get; set; }
public string ImageUrl { get; set; }
}
}
The Pipes / Returning The Data
The controller code is posted below. Note that this is just a sample and the code is manufacturing the data, versus retrieving it from a database (that is left as an exercise for the reader). Put your constants at the top of the controller or wherever you put them. I chose values as multiples of 4 because I have some complex code that will split them up in the bootstrap rendering.
private const int INFINITE_SCROLLING_BATCH = 16;
private const int INFINITE_SCROLLING_INITIAL = 32;
[HttpGet]
public ActionResult GetPagedResults2(int lastRowId, bool isHistoryBack)
{
// If “back” to this page, then don’t skip anything.
var toSkip = isHistoryBack ? 0 : lastRowId;
// If “back” to this page, then Take() ALL. Otherwise Take() the page amount
var toTake = isHistoryBack ? (lastRowId == 0 ? INFINITE_SCROLLING_INITIAL : lastRowId)
: (lastRowId == 0 ? INFINITE_SCROLLING_INITIAL : INFINITE_SCROLLING_BATCH);
// Most likely you’ll have your context and the table here
//var data = _data.StuffAndThings.Skip(toSkip).Take(toTake);
// Then you’ll map your data to the model.
// In this case we’ll just create some dummy data really FAST.
var modelData = new List<InfiniteScrollingStuff>();
for (int counter = 0; counter < 500; counter++)
{
modelData.Add(new InfiniteScrollingStuff
{
Id = Guid.NewGuid().ToString(),
FullName = $”Test Full Name {counter}“,
Description = $”Test Description {counter}“,
ImageUrl = $”/images/image{counter}.png”
// Of course this image will render as broken since not on your server.
});
}
// You could create a smaller set of data for testing and return the same thing over and over to build out your rows on the client.
var result = modelData.Skip(toSkip).Take(toTake);
return Json(result, JsonRequestBehavior.AllowGet);
}
A Room – With The View
Your view code will be very simple. Probably just a title and then the data you want to be formatted. NONE of the formatting will be done in the view. The formatting will be done later in the Java Script code that requests the data. The last “div” tag is a placeholder for the data that will be requested when the view is loaded and upon scrolling.
<input type=”hidden” id=”lastRowId” value=”0″ />
<div class=”row”>
<div class=”col-sm-6″>
<h2>@ViewBag.Title</h2>
</div>
</div>
<div id=”infiniteScrollingData”></div>
The Coffee Table – Set Your Java Script Here
You COULD put your Java Script code within <script> tags inside your view, but that makes it harder to REUSE. Possibly in ANOTHER blog I’ll show how you can reuse this generic Java Script code to adjust itself based on which view is being used. REMEMBER, hidden fields can hold data, but they can ALSO hold CODE too.
// —-==== For Infinite scrolling page. ====————————————————-
var inCallback = false; // Prevent multiple retrievals of the same data recursion
// Get default data…
$(document).ready(function () {
GetDataForInfiniteScroll(false);
});
// Get next page of data on scroll
$(window).scroll(function () {
if ($(window).scrollTop() == $(document).height() – $(window).height()) {
GetDataForInfiniteScroll(true);
}
});
// Data retrieval method
function GetDataForInfiniteScroll(scrollPage) {
if (inCallback == true) {
// Bust out of the possible multiple calls to this while the callback is attempting to return data.
return;
}
inCallback = true;
var lastRowId = ($(“#lastRowId”).val() * 1);
// If there is no lastRowId text field then don’t make the request.
if (isNaN(lastRowId)) {
inCallback = false;
return;
}
var isHistoryBack = (lastRowId > 0 && !scrollPage);
var requestUrl = ‘/ViewData/GetPagedResults’ + ‘?lastRowId=’ + lastRowId
+ ‘&isHistoryBack=’ + isHistoryBack;
$.ajax({
type: ‘GET’,
url: requestUrl,
dataType: ‘json’,
success: function (jsonData) {
var rowid = lastRowId;
if (jsonData == null) {
inCallback = false;
return;
}
var literalHtml = ”;
$.each(jsonData, function (index, item) {
literalHtml += ‘<a class=”btn-link” href=”/stuff/detail/’ + item.Id + ‘”>’
+ ‘<img class=”img-responsive” src=”‘ + item.ImageUrl + ‘” /></a>’
+ ‘<h4>’ + item.FullName + ‘</h4>’;
rowid++;
});
$(‘#infiniteScrollingData’).append(literalHtml);
if (!isHistoryBack) {
$(“#lastRowId”).val(rowid);
}
inCallback = false;
},
error: function () {
inCallback = false;
//alert(‘Error’);
}
});
return false;
}
Sit Back And Relax…
HOPEFULLY you’ve hooked this all up into an existing project and it’s working well for you. Granted, your mileage may vary and I don’t make any claims that these snippets are
ABSOLUTELY bug free. Please feel free to post comments if I have made your life easier or I have screwed up somewhere. THANKS! Don’t bother subscribing to this blog because it will probably be ANOTHER year before I post another one. Or do, and you’ll be in for a treat ONCE a year. At least it won’t be too much noise. 😉
Make WORK your favorite!
I SWEAR, I LOVE that quote from Elf. It cracks me up every time I say it.

So this blog is in response to the “you should blog more”, which I get a LOT. Where does that COME from? I don’t blog much. I would say RARELY. I try to blog about things that are productive, but they always turn into crazy rants. THAT’S what THIS is. I figure I’d get that out of the way so it would NOT be incorporated into my NEXT blog post which should actually be HELPFUL. At least I HOPE it’ll be helpful.
I SHOULD be working! There is SO MUCH to do. Why the HELL am I blogging? I read about 4 or 5 different posts about “infinite or endless” scrolling. This is a term used where your client (web or app) requests a bit of data to fill the screen which returns MUCH faster than attempting to request ALL of it. Instead of having paging controls that just take up valuable real estate on the screen, the client monitors the scrolling of the window and if the user scrolls down then more data is loaded to fill that empty space. The user keeps scrolling and the client keeps requesting more data. There were a few posts about this that were total crap and totally confusing. I stumbled across one that was pretty close, but they took their complex example and went with it (and some of their HTML was malformed and didn’t render properly). If you’re going to demonstrate a piece of core functionality, then your objects DON’T need to be that complex. Keep it SIMPLE!! THEN if you want to go into something crazy then by all means DO THAT.
So that’s what I’m going to try to do with my next example. Keep it bare bones and then if I feel like I have the time, then expand on that.
And THAT’S the problem. WHO has the time to BLOG? If there isn’t WORK or other obligations to do (like random legal bullshit) then WHY the hell would anybody BLOG when they COULD be playing Xbox? Yeah, I don’t get it either. I certainly DON’T get paid for this. I would definitely like to THANK the people who took the time to blog about endless scrolling and I could piece together the different examples (most that did NOT work right out of the box) and make it my own. So I will take the complex code that I’ve already expanded upon and make it SIMPLE for the next post.
</rant>
If you’re following this then PLEASE SAY SOMETHING. Put a comment below and THANK YOU for listening to my rant.
SpilledMilk.com Version Five dot OH!
“You should blog more, you should blog more”… ALRIGHT ALREADY!!
I thought “The Grid” would launch and I could just drag and drop content into my account and a website would magically show up. They SAID they would open up some time in the spring. And YES, technically it’s STILL spring, but you wouldn’t know it with all this snow all over the place. I guess I’m “Founding Member 29143” which makes me feel kind of like a member of The Matrix or OASIS. https://thegrid.io/#29143 I’m guessing they want MORE founding (funding) members before they launch. Their official statement was they effectively weren’t ready yet and wanted to wait. Reminds me of Pied Piper…
So I had to roll up my sleeves and get to work. For those that don’t know me, I don’t wear long sleeves so I’m ALWAYS ready. I had been meaning to redo my website for a LONG time now, but it’s hard to find the time. FINALLY, it had to be done. I had gotten a Twitter Bootstrap link from William and it’s been in my InBox since June 26, 2014. I had briefly looked at their site. http://getbootstrap.com/ There is SO much there! It was just too hard to take in all at once so I bailed on it. I figured it would take TOO much time. Flash back to about a week ago, May 8th, 2015 and I finally bit the bullet. I fired up Microsoft’s Visual Studio Ultimate 2013 and started down the path…
I created a new project/solution and chose the MVC 5.0 with razor. Studio thought for a bit and then created all the templates. The templates ALREADY included support for Bootstrap! WOO HOO!! (Whenever you see a “WOO HOO”, think Homer Simpson when he finds donuts at work.) I hit F5 and the template site came up locally on my computer. WOO HOO!! When you’re trying to get a website up and running only a week before the Denver Comic Con you’ve GOT to go with the default. DE-FAULT! DE-FAULT! DE-FAULT! (again, think Homer Simpson).
I changed the About view. I changed the Contact view. I changed the Footer in _Layout.cshtml. I went through the nav-bar and changed a few things. And I was DONE! Ok, so I wasn’t ACTUALLY done. There was still quite a bit more to do so I turned to www.PluralSight.com
I found a course by Mark Zamoyta on Pluralsight called Responsive Websites with Bootstrap 3 and it was a beginner level. SWEET! I figured it would be a walkthrough and is absolutely WAS. He walks you through all things “Responsive”: Patterns, Navigation, Images, Video, Scrolling, and Animation. I grabbed bits and pieces of his course and the example code to put into my MVC 5.0 site. His course was all done in an index.html page, but I was able translate what he did into my Index.cshtml view and _Layout.cshtml files. That brought the level up to intermediate by constantly doing that mental leap, but it wasn’t that difficult. The bummer deal for YOU is that if you don’t have a Pluralsight subscription then you’re SOL. Sorry.
I had to re-install Chrome for about the fourth time, because I really needed its developer tools (F12) for its phone and tablet emulation. This allowed me to see how things would look and perform on an iPad or iPhone. I’m really not a fan of Chrome because I’ve had WAY too much adware come through it and it’s a royal pain in the ass trying to get rid of it. So the best way is just to uninstall Chrome and then re-install it when you need it again. So we’ll see how long this lasts.
I was able to deploy last night to www.GoDaddy.com using the FTP option of Visual Studio. Of course it was not successful the first time. Or the second time. OR the third time. Or the FOURTH! I was getting some obscure security error and finally found a page on the GoDaddy site that told me what options to set and how to do it, but it was an outdated page so that option didn’t exist anymore. I needed to set the CAV PRIV to FULL since I was using MVC 5.0. How the hell do I do THAT? I called the GoDaddy support line. Lou was AWESOME! In about two minutes he figured it out and sent me a setting that I need to have in my web.config. I added that setting in the appropriate section, redeployed, and *POOF*… My site magically appeared. WOO HOO!!
I still have a LONG way to go before the con, but at least I have a new and improved site. I need to add quite a bit more content and find that sweet spot for image file size and dimensions so the pages load quicker. I’ve got to do more Search Engine Optimization (SEO) research since domain name no longer rules. Dwayne REALLY set me straight with the SEO and talked about Google Penguin versus Google Panda rules.
Just spot checking some SEO tips and tricks I’ve already done the #1 thing you can do. Convert to mobile. Twitter Bootstrap is “mobile first”. Tonight I’ll be making it FAST (that’s #4). And #3 is Google’s integration into Twitter data, so prepared to get annoyed if you’re a Facebook friend.
I’ll post the results in a few months.
Take care, and thanks for listening to my rant… Parker
Idiot Driver 3.0
“Why don’t you blog more?” … “You should blog more.” I’ve been hearing that more and more. Who REALLY has the TIME to DO this?? So it’s been WELL over two years since my last blog post. Since two-dot-oh Twitter has changed their interface and with THAT… my app was broken. I don’t know EXACTLY when that happened, but it happened. Needless to say, I was PISSED. But why should I try to fix it? Twitter was just going to change their interface AGAIN and then my application would be broken… again.
The voice control was pretty much a hack. There was PROMISE of an API (Application Programmer Interface), but nothing really showed up from Microsoft. The Windows Phone 8 came out, but I didn’t have one. So what was the point of fixing idiot driver? All roads pointed to a dead end and some SERIOUS LACK of motivation.
I’m not sure where I got this motivation to rev back up and get in gear. Could it be my new found love of the Top Gear show and how they LOVE to make fun of EVERYTHING? That really could have been IT! It’s been hard to find the time. A few hours here. A few hours there. My to-do list was getting WAY out of hand, but then suddenly I was getting it under control.
My FIRST step was go for broke. Windows 8.1 I thought. I thought WRONG. I’ve been using Visual Studio 2013 for quite some time and the NEW way to run the phone emulation was through Hyper-V (Microsoft’s virtual machine code). By default I believe the Windows Phone SDK (Software Developers Toolkit) comes install by default with VS 2013. If it doesn’t, it’s easy enough to download and get up and running. Microsoft even GIVES their “express” version away to entice more developers. So even BEFORE I generated a template project I needed to get Hyper-V going.
So the RIGHT way to do this is to go to the BIOS FIRST. Make sure that your machine supports virtualization. The Hyper-V installation will tell you what options you need. As it turns out, my aging HP HAS these options but they aren’t on be default. You can typically get to the BIOS by rebooting and then frantically pressing F2, F1, F8, F10, F11, F12… Well, it’s ONE of those. I usually hit the right one eventually. Sometimes the boot screen will actually TELL you which key to press for the BIOS. Yeah. Press THAT one. Dig around and find the virtualization options and make sure they’re ON.
Once you reboot you will have to turn on the Hyper-V options ON in the Windows Options section. This is the “Features” section of the “Programs and Features” control panel. Turn on as many of the Hyper-V options on as you can. You might have to reboot. Yes. AGAIN! But quite possibly I didn’t have to this time.
You will NOW be able to run the phone emulators. If you haven’t set things up correctly, and believe me, I HADN’T quite a few times then these things won’t run. If you’re about to give up, then don’t worry. You can run your development code on your phone or better yet, your OLD phone that you couldn’t trade in. You can register these devices when you get your Windows Phone development account. You can only have so many phones registered at a time, but I think the max is three. If you’re named your new device the SAME name, you will have to UNregister the old phone and the REregister the NEW phone.
If you’re running your emulators fine and then you see weirdness that your application doesn’t authenticate with Twitter… Check the time on the emulator. Make sure the phone emulator time matches the REAL time otherwise you won’t be able to logon. You can close down the emulator and restart it or you can go into its settings to fix the time. This probably happened overnight when your computer went to sleep and the emulator went to sleep along with the computer. When the computer wakes back up, the phone emulator DOESN’T resynchronize with the computer. Sad panda. L
Once you’ve got something on which to run your code, you can create a template. I started with Windows 8.1. I called it PhoneApp2. I figured I could change the name later. Oh wait. I didn’t change the previous version, PhoneApp1. The conversion was going slow and I was creating ALL NEW views and using ALL NEW controls. I sure did MISS the old controls though. I used the ListPicker heavily, but I didn’t see it as one of the standard controls. I had converted the MainPage, About, Settings, and Disclaimer. Things were compiling and I was getting things set up the way they were. I needed to bring TweetSharp into the fold, because the API looked very straightforward. My old code just made the REST calls using Hammock. What a pain in the ass THAT was. I knew I needed to change from THAT mess. I tried to install TweetSharp from NuGet. NO support for Windows 8.1 because the Json serializer wouldn’t install because it wasn’t built for 8.1. BUMMER! All that time wasted. Going with 8.1 and then finding out that it wasn’t going to happen.
That was actually a blessing in disguise, because I created a Windows 8.0 project. Of course I called it something original. Yes. The default. PhoneApp3 was born. When I was digging through the files again of PhoneApp1 I found a README.txt file. Why didn’t I see that before? At the top of the file mentioned the use of the Windows Phone Toolkit. Ah-HA! This was readily available through NuGet as well. Of course I NuGot it. Is that a word? Past tense of NuGet is most certainly NuGot. Or is it NuGetted?
I NuGot TweetSharp which grabbed the Newtonsoft Json Serializer and Hammock (the REST easy library). I just started with the MainPage view. A few controls including the browser (for the oAuth 1.0b authentication). A few application buttons. All I wanted to test was to see if I could talk to Twitter. I could grab a few oAuth keys from the Twitter AppDev pages to bypass the logon. I plugged this stuff into the TweetSharp code and in a few minutes I had about 20 of my latest tweets showing up in my app. SUCCESS!! I coded up the oAuth browser response stuff using most of my old code for reference. Then it was mostly a matter of cutting and pasting the controls from my old PhoneApp1 project (Idiot Driver 2.0) and pasting them into newly created files. I was determined to stick with the MVVM (Model-View-ViewModel) pattern that I’ve been using for Silverlight and WPF. I was successful at this in MOST places, except for the application buttons. You can’t {Bind} to a RelayCommand there. Maybe you can do it in 8.1, but certainly NOT in 8.0. So you have to go old-school and hook up the click event. I created a utility class that would help me with the transition from the code behind (an evil place to put your logic) to the ViewModel. I created a routine to translate the DataContext to the ViewModel generically. I also created a class to call the RelayCommand which I needed for the old-school events.
I found two articles done by somebody who helped with the voice recognition libraries and those helped a TON. I scooped some code out and go the license plate and rant prompts working. I was STUNNED that I could dictate letters and numbers and the code would actually spell out license plates (ABC 123). Since the spacing was rather arbitrary I added some translation code which would turn the word “space” into an actual space. I did the same with “hyphen” and “dash”, which in the end they all got turned into underscore “_” characters anyway so they would be recognized as a Twitter #hashtag. I had to add more options because the API isn’t great at recognizing sentences so I added code to turn the word “period” into a period. I’m not sure if I’ll go total “Dragon”, but it would be nice if you could edit your tweet using your voice versus saying the entire thing over and over until the API recognizes EXACTLY what you’ve said. That’s for FUTURE versions I guess.
So a few more hours sprucing the thing up a bit and getting a few more bugs ironed out. You can edit your default tweet list and turn on/off more options. Once piece of code that I was FINALLY able to implement is the #hashtag #everything option. #This #will #turn #ALL #your #words… Well YOU get the picture. It’s annoying. That’s why you can turn the feature on and off. I swear. I’ve SEEN tweets like this though. THEY need this app!! They can type normally and the app will make their tweet annoying FOR them.
The publishing experience was actually easier than before. The Windows Phone Dev Publishing center remembered all my settings from before. The only hard part was adding the screenshots. That wasn’t working because I needed to delete my old ones FIRST, and THEN add my WXGA ones which would scale down automatically. Once I got that figured out, my app was back out in the store within about an hour of submission. Of course as SOON as you publish, you find bugs. So the next night I’m fixing those and then re-publishing. And the next night. Which brings me to version 3.2. It’s pretty stable. And what can you expect for FREE!
So I’ve put down my coding keyboard and picked up the “creative” keyboard to bring this shiny new blog entry. I doubt you’ve made it to the end, but hopefully you don’t feel like I’ve wasted your time, since I certainly feel like I have. But if you laughed just ONCE, then I’ve done my job.
Idiot Driver 2.0
My FIRST thought is WHY did this TAKE so (expletive deleted) DAMN long? All right, all right. I’ll cut you some slack Microsoft. You DID give me the App Dev account for FREE. I’ll give you that. PLUS, you’re making sure my code isn’t stealing somebody’s password or doing something malicious to their phone.
That’s the timely news. But if we warp back to two weekends ago, I would have been throwing QUITE a few expletives towards Twitter. It was rainy and overcast and was the perfect time to update Idiot Driver to 2.0 and apply the “metro” look to the main page.
I have a few custom controls that I wrote for the settings page that prompt for input. The first one is just a single field with Ok and Cancel all placed on a modal background. I can adjust THAT font size so it’s a bit bigger (I know, it should be even BIGGER – next version). Most of the default text blocks are pretty small. Call it programming for the blind. Which I am. Oh sure, I can SEE, but I need a powerful prescription to see WELL. I added a small “drop arrow” to the metro button so it looks more like a drop down list. WHY Microsoft didn’t make this style a default is beyond me.
This modal field was NOT wrapping the text and was seriously annoying so I fixed that. AND I intercepted the “Back” button in the modal field so it wouldn’t dismiss the entire page and go back to the previous page or exit you out of the application. If the modal is displayed, the first press of the back button will dismiss the keyboard and the next press of the back button will dismiss the field. A minor technicality, but definitely a LOT less annoying.
Raj sent me some code that he found on the net which basically adds the tilt effect to EVERY control that can do it. So I added these tags to the top of each page and it just WORKED. I was pretty happy about that, but the highlight color is pure white which is pretty ugly. Maybe not ugly enough to try to change it before the next release, but I’ll get to it.
xmlns:STK=”clrnamespace:Microsoft.Phone.Controls;assembly=Microsoft.Phone.Controls.Toolkit”
STK:TiltEffect.IsTiltEnabled=”True”>
I added <<MYTAG>> substitution which is similar to the <<TAG>> substitution but it replaces the <<MYTAG>> with YOUR license plate it you’ve defined it.
The name change was pretty easy too. Just make sure that all or your application name references are changed (including the manifest). By doing that, the name will change in the Windows Marketplace. I think that’s what took so long with certification and then the subsequent publishing to the WM.
The thing that REALLY got me all steamed was the fact that Twitter changed their REST (Representational State Transfer) response. Everything above, including the manifest change, took me about 3 hours. I was all set to test things on thephone (versus testing on the emulator). That means I had to re-authenticate with Twitter. This is where things failed. I was able to get to the Twitter Authentication page, but once I pressed OK the navigation events would trigger and the response came back compressed. The code I had was definitely NOT expecting this and spit out some graphical characters in the error box. This meant that TEXT was definitely NOT coming back from Twitter and I had a long road ahead of me to try to figure out what was going wrong. I Bing’d a bit and found that Twitter had made an announcement a while back that they WOULD be doing this. GREAT! I just get my application out to the marketplace just in time for Twitter to change their
minds AGAIN. Just like with the first Twitter hurdle, the posts are REALLY old and out of date. Although I saw something that looked promising. “All I had to do was set two properties in the request and everything worked!” This was coming from some post. So I tried it, and I got nothing. I was still getting compressed data in the response. I figured I was going to have to decompress it myself.
I ended up using a GzipInputStream in one of the libraries that I was already using. There was quite a bit of setup because you have to take the “character” data and convert it to bytes. Then put the bytes into a MemoryStream. THEN hand the MemoryStream off to the GzipInputStream. I tested it and I got “bad magic”. No. SERIOUSLY. “Bad Magic” means that the first two bytes of the data were NOT correct. Not the correct “magic” (or completely arbitrary) numbers that mean THIS data stream is “Gzip Compressed”. For data that has been gzipped those magical first two bytes are 13 and 139. The stream that was coming back from Twitter was 13 and 253. I tried quite a few permutations of properties and spitting things out to the debug window and I could ONLY debug the stuff ON my phone. PHUN!!
if (response.Headers[“Content-Encoding”] == “gzip”)
{
// MAGIC: First byte (13), second byte (139)
// BOGUS coming back from Twitter: First byte (13), second byte (253)
byte[] bytes = StringToByteArray(content);
//bytes[1] = 139;
using (MemoryStream stream = new MemoryStream(bytes))
{
using (GZipInputStream gzipStream = new GZipInputStream(stream))
{
using (StreamReader reader = new StreamReader(gzipStream))
{
StringBuilder builder = new StringBuilder();
while (reader.Peek() > -1)
{
int theByte = reader.Read();
builder.Append(((char)theByte).ToString());
}
content = builder.ToString();
}
}
}
Debug.WriteLine(string.Format(“content = ‘{0}'”, content));
}
I tried different Gzip libraries that Hammock might recognize to NO avail. SIX hours later I figured I needed to head back to Bing.
I ran across a thread on a Twitter API forum that took me back to CodePlex. REALLY? I had gotten just about every library from CodePlex so why not some SOURCE? I grabbed the source for Hammock and SharpZipLib. That didn’t work. I was getting reference errors and the namespaces were out of whack. More Binging… I found https://github.com/GunioRobot/hammock and downloaded the source from there. I scooped those pre built DLLs from the projects and plopped them into my project. BOOM! Object reference not set. AGAIN! REALLY? I stepped through the code and bit and saw something out of alignment. So I brought the Hammock AND SharpZipLib project into MY project and hoped for the best. I ABSOLUTELY could NOT believe it. All of the source compiled and loaded onto my phone. It actually WORKED!! I threw my arms up in the air. TOUCHDOWN!! WOOO!! I could NOT believe it. I was hopeful, but wasn’t expecting even THIS to work. So if I initially had ALL of the source in my project then… “All I had to do was set two properties in the request and everything worked!”
I apologize to my friends that aren’t nerds who actually stuck it out to the end of this. My brain hurt for quite a few hours, at least YOURS can hurt for a few minutes reading this. 😉
Spilled Milk Comics